In summary:
- Your newborn’s brain isn’t born with a day/night cycle; it develops around 6-8 weeks.
- You can actively « program » this internal clock by creating an extreme contrast between bright days and pitch-black nights.
- True blackout (0 lux) is non-negotiable for night sleep to maximize melatonin, the sleep hormone.
- Strategic morning light is just as important as darkness for setting your baby’s circadian rhythm.
- Even a phone screen at 3 am can sabotage sleep; red-light nightlights are the only safe option.
The house is silent, but you’re wide awake, staring at a baby who is also wide awake. It’s 3 am, and for them, it might as well be midday. This profound day-and-night confusion is one of the most exhausting challenges for new parents. You’ve likely been given well-meaning advice: « keep them awake more during the day » or « try a routine. » But when your newborn’s schedule is completely inverted, these tips feel frustratingly inadequate.
But what if the solution isn’t about behaviour, but biology? What if the key isn’t forcing wakefulness, but precisely dosing the powerful, invisible nutrient of light? For the first 6-8 weeks of life, a newborn’s sleep is chaotic because their internal 24-hour clock, the circadian rhythm, simply doesn’t exist yet. Your role is not just to comfort them, but to become the architect of that internal clock. This requires moving beyond generic advice and embracing a scientific approach to light and darkness.
This guide will equip you with the knowledge and tools of a sleep consultant. We will first explore the fundamental biology of your baby’s developing brain. Then, we will dive into the practical, non-negotiable strategies for mastering absolute darkness and leveraging bright light to permanently set your baby’s clock for healthy, consolidated night sleep. It’s time to stop fighting the symptoms and start programming the system.
This article provides a comprehensive roadmap for understanding and resolving your baby’s sleep patterns. Below, you will find a summary of the key topics we will cover to guide you through this process.
Sommaire : Your Scientific Guide to Establishing Newborn Circadian Rhythms
- Why Your Newborn Has No Concept of Night Until Their Brain Develops at Week 8?
- Blackout Blinds vs Blackout Curtains vs Travel Shade: Which Achieves True Darkness?
- How to Black Out a Bay Window Without Drilling Holes in Your Rented Flat?
- Why Pitch-Black Daytime Naps Can Backfire When You Need Flexibility Later?
- When to Open the Curtains and Flood the Room with Light to Reset Your Baby’s Clock?
- Why Blue Light from Your Phone at 3am Keeps You Awake for an Extra Hour?
- How to Keep the Nursery at 16-20°C When Your Victorian House Has No Thermostat?
- Why the « Feet to Foot » Position Reduces SIDS Risk by 50%?
Why Your Newborn Has No Concept of Night Until Their Brain Develops at Week 8?
Your newborn confuses day and night because their brain hasn’t developed the biological hardware to produce melatonin, the « sleepy hormone, » or to establish a 24-hour circadian rhythm. In the womb, they received a steady supply of melatonin from you, but after birth, they must build their own factory. This process, known as circadian entrainment, doesn’t happen overnight. For the first several weeks, your baby’s sleep is governed by basic needs like hunger and comfort, not by an internal clock.
The biological control centre for this clock is a tiny part of the brain called the Suprachiasmatic Nucleus (SCN). It takes time for the SCN to mature and learn to respond to external cues, with light being the most powerful. Scientific research confirms this timeline; a foundational 1992 study found little evidence of rhythmic melatonin excretion before 9 to 12 weeks of age in full-term infants. Their bodies are simply not producing the hormone that signals nighttime.
This is why your primary role in these early weeks is to provide strong, consistent external cues to help their brain learn the difference between day and night. The process truly begins to take hold around the six-week mark. Indeed, further research published by Baby Sleep Science shows the circadian rhythm begins to consolidate newborn sleep at night starting around 6-7 weeks old. By controlling their light environment, you are giving their developing brain the clear instructions it desperately needs.
Blackout Blinds vs Blackout Curtains vs Travel Shade: Which Achieves True Darkness?
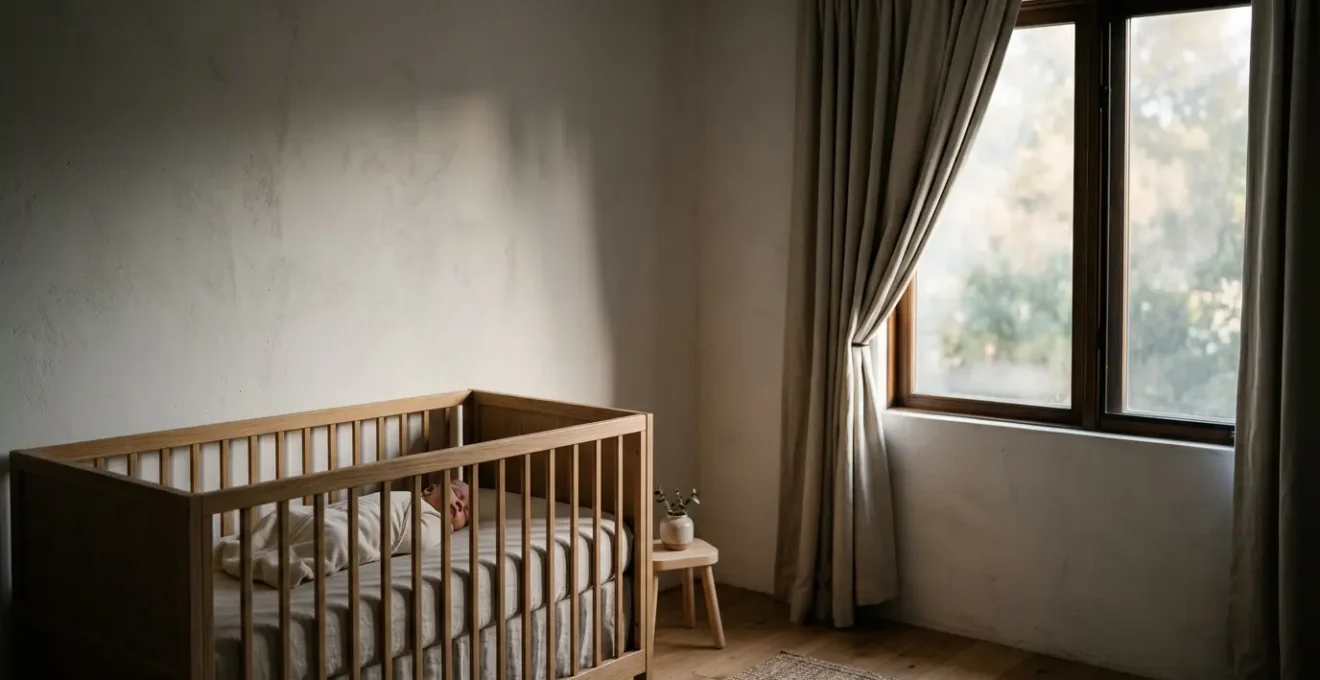
When sleep consultants talk about a dark room, they mean something far darker than what most people achieve. The goal is a zero-lux environment, a pitch-blackness so complete you cannot see your hand in front of your face. This isn’t an exaggeration; it’s a scientific necessity. Even a small amount of « light leakage » can be enough to disrupt the production of melatonin. Research indicates that as little as 5 to 10 lux can suppress melatonin in sensitive individuals, and a baby’s eyes are even more sensitive than an adult’s.
This « light halo » effect around standard curtains is a common source of sleep disruption, often unknowingly sabotaging a parent’s efforts. The image below shows exactly how this seemingly insignificant gap allows disruptive light to penetrate the room.

As you can see, the fabric itself may block light, but the installation method is what determines true success. Not all « blackout » solutions are created equal in their ability to eliminate these gaps. To make an informed choice for your home, it’s essential to compare the real-world performance of different options.
The following table, based on an analysis of light-blocking performance, breaks down the key differences between common solutions. Notice the stark contrast in typical room lux levels.
| Solution Type | Light Blocked Through Fabric | Typical Room Lux Level | Best For | Installation |
|---|---|---|---|---|
| Standard Blackout Curtains | 85-99% | 10-50 lux (edge gaps) | Budget-conscious, owned homes | Curtain rod required |
| Blackout Roller Blinds (inside mount) | 90-95% | 4-22 lux (side gaps) | Standard windows, moderate light control | Bracket mounting |
| Sealed-Track Blackout Shades | 100% | 0 lux (no gaps) | Total light annihilation, shift workers, infants | Professional or advanced DIY |
| Portable Travel Shades | 70-85% | 20-60 lux (multiple gaps) | Temporary, travel, renters | Suction cups, no-drill |
How to Black Out a Bay Window Without Drilling Holes in Your Rented Flat?
Bay windows, a charming feature in many older UK properties, present a unique and often frustrating challenge for achieving a true blackout, especially for renters who are unable to drill holes. The multiple angles create numerous points for light to leak in. However, with a combination of clever, damage-free products, you can create a highly effective, temporary solution that will see you through the crucial early months.
This method focuses on using tension and adhesion to create a sealed environment without a single screw. It’s a practical, no-drill approach to conquering the complex geometry of a bay window. The following plan provides a step-by-step guide to achieving a near-perfect blackout in your rented flat.
Your Renter-Friendly Bay Window Blackout Plan:
- Measure & Mount with Tension: Measure each segment of the bay window individually (left angle, center, right angle). Order custom-cut tension rods for each section. These are pressure-mounted between the window frames, requiring no drilling.
- Select & Size Fabric: Purchase blackout fabric or pre-made curtain panels with a 100% light-blocking rating. Crucially, add at least 4-6 inches (10-15 cm) to the width measurement for each panel to ensure generous overlap at the junctions between window segments.
- Support with Adhesion: Install heavy-duty Command hooks or industrial-strength Velcro strips (like 3M brand, rated for 5+ lbs / 2.2kg+) along the top edge of each window frame. This provides extra support for the curtain’s weight without marking the walls.
- Seal the Gaps: Use magnetic tape attached to the fabric edges, which will cling to adhesive steel tape applied to the window frames (removable with adhesive remover). Alternatively, apply blackout static-cling film directly to the glass as a powerful second layer.
- Block Bottom Leaks & Test: Address light leaks at the bottom with removable draft stoppers or by simply pooling extra fabric length on the windowsill. Test your work by using a free lux meter app on your phone; aim for a reading under 10 lux for a good result, and under 5 for an excellent one.
Why Pitch-Black Daytime Naps Can Backfire When You Need Flexibility Later?
While a pitch-black room is the non-negotiable gold standard for nighttime sleep and early newborn naps, rigidly maintaining this for every single daytime nap beyond 4-6 months can create an unintended problem: a powerful sleep crutch. Your child may become so dependent on the « zero lux » environment that they are completely unable to nap anywhere else—in the car, at a grandparent’s house, or in a pushchair. This can severely limit your family’s flexibility.
This happens because of the two-process model of sleep regulation. Night sleep is driven by both sleep pressure (Process S) and the strong circadian drive (Process C). Daytime naps, however, rely more heavily on sleep pressure alone. By making the nap environment identical to the night environment, you risk creating an over-reliance on environmental cues. The baby learns they *can only* sleep when it’s perfectly dark, rather than learning to sleep when their body feels tired.
Case Study: Balancing Circadian Cues and Flexibility
Research on circadian development in early life highlights the need for an evolving strategy. While establishing strong light-dark contrasts is critical for initial rhythm development (0-3 months), maintaining overly rigid sleep associations can limit adaptability. The two-process model of sleep regulation shows that daytime sleep is more vulnerable to environmental dependency. Sleep experts recommend a transition after 4-6 months: maintain pitch-black conditions for nighttime sleep but introduce moderate darkness for daytime naps. This could mean using dimming blinds instead of full blackout, or allowing a small amount of ambient light. This approach supports both continued circadian consolidation for nights and the development of real-world napping flexibility.
When to Open the Curtains and Flood the Room with Light to Reset Your Baby’s Clock?
The moment your baby’s designated wake-up time arrives (e.g., 7 am), you should decisively and completely open the curtains. Don’t gradually introduce light; the goal is a dramatic shift from total darkness to bright light. This powerful signal is the most important « wake up » message you can send to your baby’s developing brain. Think of it as the morning dose of the « light nutrient. » This daily ritual tells their internal clock, « The day has officially begun. Stop producing melatonin now. »
Consistency is everything. This action should be performed at the same time every single day, even on weekends, regardless of when your baby actually woke up. If they wake at 6:30 am, you can feed and comfort them in the dark, but the « day » doesn’t start until you flood the room with light at 7 am. This anchors their schedule. As neuroscience research on circadian cues demonstrates, morning sunlight exposure of 10-30 minutes helps anchor sleep timing and improves daytime alertness. Whenever possible, make this natural daylight rather than artificial light.
This daily ritual of flooding the room with light is a powerful, visual cue for your baby’s developing brain, creating a stark and unmistakable contrast with the darkness of night, as depicted below.

This single, consistent action is one of the most effective tools you have for ending day/night confusion. It provides the clear, unambiguous « on » switch that complements the « off » switch of nighttime darkness, helping to firmly establish a healthy 24-hour cycle.
Why Blue Light from Your Phone at 3am Keeps You Awake for an Extra Hour?
During a 3 am feed, the temptation to scroll through your phone is immense. It feels like a lifeline in the lonely, dark hours. However, that « quick check » is sending a powerful ‘daytime’ signal directly to both your brain and your baby’s. The short-wavelength blue light emitted by phone screens is exceptionally effective at suppressing melatonin production. It essentially tells the SCN, « It’s morning! Wake up! » This can make it significantly harder for both of you to fall back asleep after the feed.
A baby’s eyes are not fully developed; their pupils are larger and lenses are clearer, meaning they transmit even more of this disruptive blue light to the retina than an adult’s eye does. So, while you may be trying to be discreet, the light from your phone is a biological megaphone shouting « wake up » to your infant. This is why a strict « no screens » policy in the nursery during sleeping hours is a non-negotiable for effective sleep training.
Of course, you need some light to see what you’re doing. But not all light is created equal. The key is to use the dimmest possible light in the correct colour spectrum. Here is a hierarchy of light sources for nighttime feeds and changes, from absolute worst to best:
- Worst Option: Phone screen or tablet. Emitting blue-wavelength LED at 300-500 lux, this can suppress melatonin by up to 50% in parents and even more in babies.
- Poor Option: Standard white or blue-hued nightlight. At 50-100 lux, it still emits significant blue wavelengths that interfere with the brain’s « night » signal.
- Moderate Option: A dim regular lamp with a warm bulb. Using a 2700K colour temperature bulb at 20-40 lux reduces the blue light but doesn’t eliminate the melatonin-suppressing effect.
- Best Option: Specialized amber or red-light nightlight. Operating under 10 lux and in the 600-700nm wavelength, red and amber light have a negligible effect on melatonin production. Always use the dimmest setting necessary for safe task completion.
How to Keep the Nursery at 16-20°C When Your Victorian House Has No Thermostat?
Maintaining a consistent nursery temperature is a key pillar of good sleep hygiene, but it’s a particular challenge in older UK homes like Victorian or Edwardian properties, which are known for being draughty and difficult to regulate. The recommended temperature range for a baby’s room is between 16-20°C (61-68°F). This isn’t just for comfort; it’s rooted in biology. As circadian physiology research demonstrates, a slight drop in core body temperature is a powerful biological signal for sleep initiation, directly linking temperature control to circadian rhythm function. A room that is too warm can interfere with this process and increase the risk of SIDS.
So, how do you manage this without a central thermostat? You must become a master of manual temperature regulation. Your most important tool is a simple, reliable digital room thermometer placed near the cot (but out of reach). This is your source of truth. From there, you can employ a combination of low-tech strategies to keep the room in the safe zone.
In winter, thermal blackout curtains (a dual benefit!) are excellent for preventing heat loss through single-glazed windows. Use draught excluders at the bottom of the door and check for cold air coming from floorboards. In summer, the same blackout solutions can help keep the sun’s heat out during the day. Use a fan to circulate air (without pointing it directly at the baby) and dress your baby in minimal clothing. The most crucial adjustment tool is your baby’s sleepwear. Instead of using loose blankets, rely on TOG-rated sleeping bags. These are standardised for warmth, allowing you to choose the appropriate level (e.g., 0.5 TOG for a heatwave, 2.5 TOG for winter) to keep your baby at a safe and comfortable temperature all night.
Key takeaways
- Your primary job in the first 8 weeks is to be your baby’s external clock by creating a stark contrast between bright days and pitch-black nights.
- True « blackout » means 0 lux—no light leakage. Standard curtains almost always fail; sealed blinds or DIY solutions are necessary.
- Morning light is a non-negotiable tool. Flood the room with bright, natural light at the same time every day to set the « wake-up » signal.
Why the « Feet to Foot » Position Reduces SIDS Risk by 50%?
The « feet to foot » position is a cornerstone of safe sleep advice from organisations like The Lullaby Trust in the UK. It is a simple yet profoundly effective rule: when you place your baby in their cot, their feet should be touching the bottom end of the cot. This single action mechanically prevents them from wriggling down under their blankets, which could lead to their head becoming covered and subsequent overheating or re-breathing of carbon dioxide—two major risk factors for Sudden Infant Death Syndrome (SIDS).
This practice ensures that any blankets can only ever be pulled up to the level of their chest, tucked in securely under their arms. It physically makes it impossible for them to slide further down into a dangerous position. While this is a critical safety rule in its own right, it’s a mistake to view it in isolation. It is one of three equally important pillars that create a holistically safe and effective sleep environment.
The « feet to foot » rule addresses physical safety, but it works in concert with the environmental controls of darkness and temperature. A baby who is too hot is at greater risk, and a baby whose sleep is constantly disrupted by light is more likely to move around the cot restlessly. As the Baby Sleep Science Research Team puts it, creating the optimal sleep environment is about an integrated system:
The room must be DARK (light control), COOL (temperature control), and SAFE (bare crib, feet-to-foot). This frames the safety rule as an integral pillar of the overall sleep strategy.
– Baby Sleep Science Research Team, Important Sleep Basics All Parents, Pediatricians and Caregivers Should Know
Armed with this understanding of light, temperature, and safety as an interconnected system, you can move from reactive survival to proactive sleep shaping. Start tonight by assessing your nursery for light leaks, checking the room thermometer, and ensuring a safe cot setup. You now have the consultant’s toolkit to build a healthy sleep foundation that will last for years to come.