In summary:
- Treat your changing station not as furniture, but as a high-performance workstation optimised for speed and safety.
- Implement a 3-Zone System (Clean, Action, Dirty) to ensure everything is within reach and you never take a hand off your baby.
- Use a « Hub-and-Spoke » model with a main station and smaller caddies in multi-level homes to eliminate unnecessary trips.
- Stock supplies in batches (e.g., 20 nappies) to reduce « cognitive load » and decision fatigue, especially during night changes.
- Prioritise ergonomics by setting the table height to your hip level to prevent chronic back pain.
The scene is familiar to any new parent: a wriggling baby, a sudden need for a nappy change, and a frantic search for wipes that have mysteriously vanished. You’re told to « keep everything within reach, » but this advice often leads to a cluttered, inefficient surface that only adds to the chaos. The real challenge isn’t just about storage; it’s about process. A nappy change is one of the most repeated tasks of early parenthood, and getting it wrong is not just frustrating—it’s a drain on your time and physical well-being.
But what if the key wasn’t just having things nearby, but arranging them in a systematic workflow? What if, instead of just tidying, we approached the changing table like an efficiency consultant designing a workstation? The goal is to eliminate every wasted second and every unnecessary physical strain. By deconstructing the process, we can build a system that guarantees safety, speed, and sanity.
This guide moves beyond generic tips to provide a strategic framework. We will explore how ergonomic science can save your back, how a simple three-zone setup can make changes one-handed, and how the right supplies can protect your baby’s delicate skin from the start. It’s time to transform the nappy change from a chaotic chore into a mastered, sub-2-minute procedure.
This article lays out a complete system for optimising your nappy changing process. Below is a summary of the key strategies we will cover to make your station a model of efficiency and safety.
Summary: The Complete Nappy Change Efficiency System
- Why the Wrong Changing Table Height Gives You Back Pain by Week 3?
- How to Set Up a 3-Zone Changing Station That Keeps One Hand on Baby Always?
- Travel Changing Mat vs Caddy System: Which Works Better for a 3-Storey House?
- The 10-Second Distraction That Sends 500 UK Babies to A&E from Changing Tables Yearly
- Why Keeping 20 Nappies at the Changing Station Saves You 15 Minutes Daily?
- How to Arrange Your Nursery So Night Feeds Take 10 Minutes Instead of 30?
- Barrier Cream vs Treatment Cream: Which to Apply Before the Rash Appears?
- Why Water and Cotton Wool Beat Fancy Wipes for the First 6 Weeks?
Why the Wrong Changing Table Height Gives You Back Pain by Week 3?
The persistent, dull ache in your lower back that arrives by the third week of parenthood is not a rite of passage; it’s a design flaw. Performing 10-12 nappy changes a day on a surface that is too low or too high forces your body into unnatural positions. A table that is too low causes you to hunch, putting direct strain on your lumbar spine. A table that is too high forces you to raise your shoulders and elbows, creating tension in your neck and upper back. This repetitive strain, multiplied over hundreds of changes, is a direct path to chronic pain.
The solution is a core principle of ergonomics: work at hip height. Your changing table surface should be roughly level with your hip bone. This allows you to stand with a straight back and neutral shoulders, with your arms comfortably bent at a 90-degree angle. This posture transfers the effort to your arms and core, away from the vulnerable muscles of your spine. It completely eliminates the need to bend or twist, which are the primary movements that lead to injury.
Before purchasing or setting up a changing table, stand next to it. If you have to bend over, it’s too low. If you have to lift your elbows above your waist, it’s too high. For parents of different heights, a split-level solution like a dresser with a changing pad on top for the taller parent and a dedicated, lower caddy system for the shorter parent can be an effective compromise. Investing a few minutes to get the height right prevents weeks of debilitating pain, freeing you to focus on your baby, not your backache.
How to Set Up a 3-Zone Changing Station That Keeps One Hand on Baby Always?
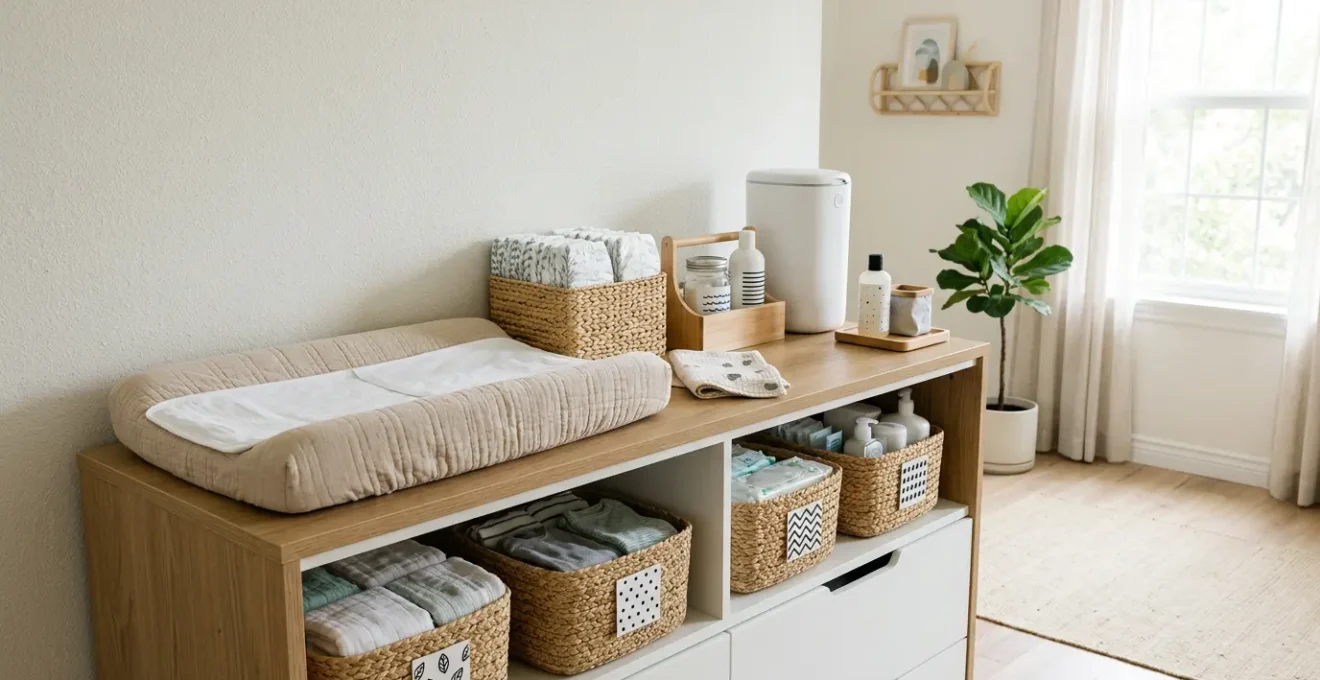
The cardinal rule of nappy changing is to keep one hand on your baby at all times. The most common reason parents break this rule is a poorly organised station that forces them to turn or reach. The solution is to stop thinking about a « pile of supplies » and start thinking in terms of a workflow. An efficient changing station is divided into three distinct, logical zones, arranged for a seamless, one-handed operation.

This strategic layout organises the nappy change into a linear process, with supplies exactly where you need them at each stage. Zone 1: The Clean Zone (Input). This is where all fresh supplies are stored, typically on the side of your non-dominant hand. This zone contains fresh nappies, wipes, and barrier cream. You access this area first. Zone 2: The Action Zone (Process). This is the changing mat itself. This area should be completely clear, except for the baby and a single toy for distraction. Zone 3: The Dirty Zone (Output). This is where all used items go, located on the side of your dominant hand, just past the baby’s feet. This zone contains the nappy pail and a small basket for soiled clothes. This prevents you from ever passing a dirty nappy over the clean supply area, eliminating cross-contamination.
By using this system, your hands follow a simple path from clean to action to dirty, without ever crossing over or requiring you to turn away. This systematic approach is the single most effective way to ensure one hand can always remain safely on your baby.
Case Study: The Hub-and-Spoke System for Multi-Floor Homes
A parent in a two-story house found themselves navigating stairs up to 14 times a day just for nappy changes, increasing both physical strain and risk. By applying a « hub-and-spoke » model, they established the main, fully-stocked changing table in the nursery (the « hub »). Then, they created a secondary, smaller changing station (a « spoke ») on the main floor using a portable caddy with essential supplies. This simple system eliminated the need to carry the infant up and down stairs for every change, dramatically improving safety and efficiency.
Travel Changing Mat vs Caddy System: Which Works Better for a 3-Storey House?
For parents living in homes with more than two levels, a single changing station is impractical and unsafe. The « hub-and-spoke » model becomes essential, but choosing the right « spoke » depends on your home’s layout and your daily routines. The two primary options for creating secondary changing stations are a portable changing caddy or a foldable travel mat. Neither is inherently better; they simply solve different problems. A caddy excels as a semi-permanent satellite station, while a travel mat offers ultimate flexibility.
A caddy is essentially a basket with compartments, pre-stocked with a day’s worth of supplies. It’s designed to be placed in a high-traffic area, like the living room, turning a corner of the floor into a consistent, reliable changing spot. Its main advantage is high storage capacity. In contrast, a travel mat is designed for maximum portability, folding flat to be stored in a drawer or carried to any room. Its strength lies in its flexibility, allowing you to perform a change in a guest room, the kitchen, or even the garden. The choice depends on whether you need a fixed secondary location or the ability to create a pop-up station anywhere.
The following table breaks down the specific characteristics of each system, helping you decide which tool best fits the unique challenges of your multi-level home.
| Feature | Travel Changing Mat | Caddy System |
|---|---|---|
| Portability | Highly portable, folds flat, easy to carry room-to-room | Moderate portability, requires carrying with handle |
| Best Use Case | Flexible locations (guest rooms, kitchen, outdoor spaces) | Consistent secondary location (living room floor, specific bedroom) |
| Storage Capacity | Limited – holds only immediate essentials within the mat | High – multiple compartments for nappies, wipes, creams, spare clothes |
| Setup Time | Quick unfold (5-10 seconds) | Already set up if stationed (0 seconds) |
| Restocking Frequency | After each use or daily | Every 2-3 days depending on capacity |
| Floor Space | Minimal when folded, stores in drawer or closet | Requires permanent floor or shelf space |
The 10-Second Distraction That Sends 500 UK Babies to A&E from Changing Tables Yearly
The most dangerous moment at a changing table isn’t when a baby is crying or wriggling; it’s the brief, 10-second window when a parent turns their back. This momentary lapse is almost always caused by a poorly organised station—reaching for a forgotten nappy, searching for cream, or grabbing a fresh outfit from a drawer across the room. These seemingly minor interruptions are a major factor in infant injuries. In the UK, falls account for over 50% of emergency admissions for children under 1 year, and falls from changing tables are a significant contributor.
The danger is not the baby’s intention but their sudden, unpredictable capability. An infant who has never rolled over before can and will choose the one moment you are distracted to do it for the first time. The changing table, therefore, must be treated with the same respect as a body of water: never leave a baby unattended, not even for a second. The safety features of the table—the straps and contoured sides—are designed to be a secondary safety measure, not a primary restraint system. Your hand is the primary restraint.
This is why the 3-zone system is not just an efficiency hack; it is a critical safety protocol. By ensuring every single item required for a change is within arm’s reach *before* the baby is placed on the mat, you eliminate the root cause of that 10-second distraction. Before you begin, do a mental checklist: nappy, wipes, cream, disposal bag, fresh clothes. If anything is missing, retrieve it first. Engineering the cause of distraction out of the process is the only guaranteed way to keep your baby safe.
Why Keeping 20 Nappies at the Changing Station Saves You 15 Minutes Daily?
The advice to « stock up on nappies » seems obvious, but the reason it’s so effective goes deeper than simply avoiding a trip to the cupboard. The true enemy of efficiency, especially for a sleep-deprived new parent, is not distance, but « task-switching. » Every time you have to stop the nappy change, walk to a different location, open a cupboard, and retrieve a single item, you are forcing your brain to switch contexts. This constant mental gear-shifting is exhausting and surprisingly time-consuming.
This isn’t just a feeling; it’s a measurable phenomenon. As research from Wake Forest University demonstrates that cognitive efficiency diminishes each time the brain switches between tasks. This « switch cost » adds up. A 30-second trip for a nappy, repeated 10 times a day, isn’t 5 minutes of lost time; the cumulative effect of stopping, re-engaging, and calming a now-fussy baby easily turns it into 15 minutes of chaos.
This is why the specific advice is to keep at least 20 nappies—a generous one to two-day supply—directly at the changing station. This is a strategy to minimise cognitive load. By « batching » the task of restocking into a single, once-a-day activity, you free up your mental resources during the actual nappy changes. The goal is to make the process as automatic as possible, operating on muscle memory rather than active decision-making. A fully stocked station allows you to stay in the zone, focused on the single task at hand, which is the key to both speed and sanity.
How to Arrange Your Nursery So Night Feeds Take 10 Minutes Instead of 30?
A 3 AM nappy change during a night feed can quickly escalate a 10-minute feed into a 30-minute, fully-awake ordeal for both you and your baby. The key to preventing this is applying workflow efficiency principles to your nursery layout, specifically creating a « Night-Time Work Triangle. » Borrowed from kitchen design, this concept involves placing the three key stations—the crib, the feeding chair, and the changing table—in close, logical proximity to one another, ideally within two or three steps.

The goal is to move from crib to chair to changing table and back to crib with minimal movement, light, and noise. A dim, red-toned night light is crucial, as red light is the least disruptive to melatonin production, helping both you and the baby stay in a sleepy state. A well-designed work triangle, illuminated properly, allows you to navigate the entire feed-and-change process almost on autopilot, preserving precious sleep for everyone.
To truly master the night-time change, you must prepare before you go to bed. Setting up your station for a 3 AM « autopilot » mode eliminates fumbling in the dark and reduces the cognitive load of making decisions when you are half-asleep.
Your Action Plan: 3 AM Autopilot Setup
- Pre-fill bottles with water and store them in an insulated container at the feeding station before going to bed.
- Pre-measure formula powder in individual dispensers or containers for one-handed access in darkness.
- Set out a single nappy and a pre-opened wipe packet on the changing station surface to eliminate decision-making.
- Position a dim red-toned night light to provide visibility without disrupting melatonin production for parent or baby.
- Have a spare sleepsuit and a small laundry bag within arm’s reach of the changing station for quick clean-ups.
Key takeaways
- The 3-Zone System (Clean, Action, Dirty) is the foundation of a safe and efficient changing station workflow.
- For multi-level homes, a « Hub-and-Spoke » model using a main station and satellite caddies eliminates risky trips on stairs.
- The « Nursery Work Triangle » (Crib, Chair, Changing Station) minimises movement and disruption during night feeds.
Barrier Cream vs Treatment Cream: Which to Apply Before the Rash Appears?
Understanding the difference between a barrier cream and a treatment cream is fundamental to a proactive, efficient skincare routine for your baby. Many parents use them interchangeably, but this is a mistake. They have entirely different purposes and using the right one at the right time is key to preventing nappy rash before it even starts. The core principle is simple: one is for prevention, the other is for cure.
A barrier cream is your daily-use, preventative tool. Its job is to form a protective, waterproof layer on healthy skin. This shield prevents moisture from urine and irritants from stool from ever making contact with the skin’s surface. It should be applied thinly but completely at every single nappy change, as part of your standard workflow. A treatment cream, on the other hand, is a medicated product designed to heal an existing rash. It often contains antifungal or anti-inflammatory ingredients and should only be used once a rash has appeared, and often only for a limited time.
Using a treatment cream on healthy skin is ineffective and can sometimes cause unnecessary irritation. Conversely, using only a barrier cream on an established rash will not resolve the underlying problem. The efficient, systematic approach is to make a preventative barrier cream a non-negotiable step in your 3-zone workflow. This proactive strategy will, in most cases, eliminate the need for reactive treatment creams altogether.
This table from a study in the PMC Journal clarifies the crucial differences to ensure you’re using the right product at the right time.
| Aspect | Barrier Cream (Preventative) | Treatment Cream (Curative) |
|---|---|---|
| Purpose | Protect healthy skin from moisture and irritants | Heal existing nappy rash or dermatitis |
| When to Use | Every nappy change, applied to clean dry skin | Only after rash appears |
| Key Ingredients | Zinc Oxide (forms physical barrier), Petroleum (seals moisture out) | Clotrimazole (antifungal for yeast), Hydrocortisone (reduces inflammation, with doctor advice) |
| Mechanism | Creates a protective shield on skin surface | Treats underlying infection or inflammation |
| Application Frequency | With every change (6-10 times daily) | 2-3 times daily until rash clears |
| Analogy | Sunscreen (prevents damage) | After-sun lotion (repairs damage) |
| High-Risk Periods | Teething, diarrhoea, after antibiotics, when introducing acidic foods (citrus, tomatoes) | Once redness, bumps, or skin breakdown is visible |
Why Water and Cotton Wool Beat Fancy Wipes for the First 6 Weeks?
In a world of high-tech baby products, the recommendation to use simple cotton wool and water can seem outdated. However, this advice is rooted in a deep understanding of a newborn’s unique skin biology. For the first six weeks of life, a baby’s skin is fundamentally different from an adult’s, making it exquisitely sensitive to chemicals, fragrances, and preservatives found in many commercial wipes.
The primary reason is the skin barrier. The outermost layer, the stratum corneum, acts as a protective wall. As research published in Pharmaceutics confirms that infant skin has a thinner stratum corneum and smaller skin cells than adult skin. This makes it more permeable and less effective at blocking potential irritants. Furthermore, a newborn’s skin is still developing its « acid mantle, » a fine, slightly acidic film that protects against bacteria. As one research team notes:
After birth, skin acidification begins immediately, with pH levels decreasing to a range of 5–6 within the first few days and continuing to decline over the first month.
– Research team from multiple institutions, Skin Barrier Function in Neonates and Infants (PMC Journal)
Many baby wipes contain surfactants (for cleaning) and preservatives that can disrupt this delicate, developing pH balance, potentially leading to irritation and dryness. Water and cotton wool, being completely inert and pH-neutral, offer effective cleaning without any risk of chemical interference during this critical developmental window. While high-quality, water-based wipes can be a convenient option later on, sticking to the basics for the first six weeks is a simple, evidence-based strategy to give your baby’s skin the best possible start.
By implementing these systematic approaches—from ergonomic positioning and workflow zoning to cognitive load reduction and proactive skincare—you can transform nappy changing from a daily point of friction into a moment of calm, efficient care.