
In summary:
- Your baby’s cot must be an empty space: only a firm, flat mattress and a fitted sheet. All soft toys, bumpers, and loose bedding pose a suffocation risk.
- Second-hand cots are a major risk unless you can verify they meet the current BS EN 716:2017 safety standard, especially regarding bar spacing (45-65mm).
- Arrange furniture to support a « predictive safety » mindset. Babyproof not for the baby you have now, but for the crawling, climbing baby you will have in a few months.
- Maintain a room temperature of 16-20°C. Use zero-VOC paint and assemble furniture at least 4-6 weeks before the due date to allow the room to air out completely.
The journey to parenthood is filled with joyful preparations, and none is more personal than designing the nursery. You’ve likely spent hours on Pinterest, choosing colour palettes and dreaming of the perfect, serene space for your little one. But as the due date approaches, a quiet, anxious voice can begin to whisper: « Is this actually safe? » You know the obvious advice—keep the cot away from radiators, avoid blind cords—but the sheer volume of products and conflicting opinions can feel overwhelming.
The common approach is a last-minute flurry of babyproofing, a checklist of « don’ts » ticked off in a panic. This often misses the hidden dangers lurking in second-hand bargains or the latest Instagram-worthy trends. You might focus on what your newborn can do, forgetting that in a matter of months, they will be rolling, grasping, and pulling themselves up on the very furniture you so lovingly chose.
But what if the key to true nursery safety isn’t a simple list of rules, but a fundamental shift in mindset? What if you could adopt a system of predictive safety—an approach that anticipates your baby’s next developmental leap and designs a truly secure environment from the ground up? This isn’t about creating a sterile bubble; it’s about building a space where your child can thrive, and you can rest, knowing that safety is woven into the very fabric of the room.
This guide will walk you through that system. We will move beyond the platitudes to examine the specific British Standards you need to know, how to arrange a nursery for maximum safety and efficiency, when to buy key items to avoid hidden risks, and why thinking like a 7-month-old is the best thing you can do for your 3-month-old.
Summary: A UK Parent’s Guide to Nursery Safety: Positioning the Cot and Beyond
- Why Your Beautiful Second-Hand Cot Might Fail Current British Safety Standards?
- Which UK Paint Brands Are Actually Low-VOC Enough for a Newborn’s Room?
- How to Arrange Your Nursery So Night Feeds Take 10 Minutes Instead of 30?
- The Instagram Nursery Trend That Puts Soft Toys Where They Can Suffocate Your Baby
- When to Buy the Cot, Mattress, and Changing Table to Avoid Third-Trimester Panic?
- How to Keep the Nursery at 16-20°C When Your Victorian House Has No Thermostat?
- How to Set Up Your Living Room So Your Baby Wants to Move and Explore?
- Why Babyproofing at 3 Months Prevents the A&E Visit at 7 Months?
Why Your Beautiful Second-Hand Cot Might Fail Current British Safety Standards?
That beautiful, vintage-style cot you found on Facebook Marketplace seems like a charming and sustainable choice. However, it could harbour hidden dangers that make it non-compliant and unsafe. Since the introduction of evidence-based sleep safety guidelines in the UK, a focus on rigorous standards has contributed to a dramatic fall in Sudden Infant Death Syndrome (SIDS). In fact, an 81% reduction in the SIDS rate has been observed since these campaigns began, underscoring why strict adherence to modern standards is not negotiable.
The current safety standard for cots in the UK is BS EN 716:2017. This isn’t just bureaucracy; it’s a detailed specification designed to prevent specific, known accidents. An older cot, even one that looks sturdy, might have bar spacing that is too wide (risking head entrapment) or too narrow (risking limb entrapment). It may have decorative cut-outs or corner posts that can snag clothing, creating a strangulation hazard. Without the official, permanent stamp or sticker citing « BS EN 716 » on the frame, you have no guarantee it has been tested for these risks.
Making a standard-driven decision is the first step in creating a truly safe environment. Choosing a new, certified cot or a second-hand one where you can physically verify the markings and measurements isn’t about being overly cautious; it’s about leveraging decades of safety research to protect your child. Before accepting any second-hand cot, it is essential to perform a thorough physical audit against these life-saving criteria.
Your Second-Hand Cot Safety Checklist (Based on BS EN 716:2017)
- Measure Bar Spacing: Use a ruler or tape measure. The gap between the bars must be precisely between 45mm and 65mm to prevent both head and limb entrapment.
- Check Mattress-to-Top Distance: With the mattress base on its highest setting, measure the internal height from the mattress to the top of the cot rail. It must be at least 500mm (50cm).
- Inspect for Hazardous Holes: Check the frame for any holes with a diameter between 7mm and 12mm. These are the perfect size to trap a baby’s finger and restrict blood flow.
- Verify Corner Posts & Protrusions: Run your hand over the entire structure. Nothing should protrude more than 8mm, as this can catch on clothing when a baby is moving or trying to climb.
- Look for Permanent Safety Markings: The cot frame must display the BS EN 716 reference and the manufacturer’s name. This should be stamped into the wood or on an industrial, non-peelable sticker.
Which UK Paint Brands Are Actually Low-VOC Enough for a Newborn’s Room?
Choosing a paint colour is one of the most exciting parts of decorating a nursery, but the « new paint smell » we often associate with a freshly decorated room is the scent of Volatile Organic Compounds (VOCs) being released into the air. For a newborn’s developing respiratory system, this is a significant and avoidable hazard. The term « baby-safe » is used frequently, but it lacks a legal definition. True safety lies in choosing paints that are not just « low-VOC » but zero-VOC and have been certified as safe for children’s environments.
The key certification to look for in the UK is EN 71-3, also known as the « Toy Paint » directive. This standard ensures that if a child were to lick or chew on a painted surface (like the rail of their cot), they would not ingest harmful levels of toxic elements like lead or chromium. This goes far beyond just VOC content. Top-tier brands also eliminate other harmful chemicals like isocyanates and MIT, which can be found in many conventional paints.

As you can see, the application of a high-quality, certified paint results in a smooth, pure finish that doesn’t compromise on air quality. This visible quality is a reflection of the invisible safety it provides. When selecting your paint, it’s crucial to look beyond the colour chip and examine the technical data sheet for these certifications. Many excellent UK brands now specialize in creating beautiful, durable, and genuinely safe paints for nurseries, offering parents peace of mind without sacrificing style.
To help you navigate the options, this table compares some of the leading baby-safe paint brands available in the UK, highlighting what makes each a responsible choice. This information is based on publicly available data from manufacturers like Little Knights.
| Brand | VOC Level | Key Certification | Special Features |
|---|---|---|---|
| Little Knights | 100% Zero VOC | EN 71-3 Toy Safe | Free from MIT, xylene, isocyanate; antibacterial protection |
| Little Greene (Intelligent Range) | Zero added VOC | Which? Best Buy 2024 | Water-based, 2-4 hour dry time, highly washable |
| Graphenstone Ecosphere | <1 g/L | Cradle to Cradle GOLD | Photocatalytic surface, naturally inhibits mould |
| Earthborn Clay Paint | Ultra-low VOC | Breathability certified | Natural mineral formulation, Class 1 vapour open |
| Benjamin Moore Eco Spec | Zero VOC + colorants | Green Seal 11, Asthma & Allergy Foundation approved | Includes zero-VOC primer option |
How to Arrange Your Nursery So Night Feeds Take 10 Minutes Instead of 30?
In the depths of night, when you’re woken for the third time, every fumbled-for bottle, every trip across the room for a muslin, and every bright light that fully wakes both you and the baby adds precious minutes and stress. An efficient nursery layout isn’t a luxury; it’s a critical component of your survival strategy and, by extension, your baby’s safety. An exhausted parent is a less vigilant parent. By thinking of the nursery as a workspace, you can design a ‘golden triangle’ for night feeds that makes the process swift, calm, and dark.
The three points of this triangle are the cot, the feeding chair, and the changing station. The goal is to be able to move between these three points in just a few steps, with everything you need within arm’s reach at each station. This prevents you from having to cross a dark room, turn on a main light, or hunt for supplies. The key is to create a workflow that is so intuitive it can be done on autopilot at 3 AM.
This ergonomic approach is especially vital in the typically smaller rooms of UK houses. It’s not about having more space, but about using the space you have with maximum efficiency. A tiered utility cart, like the IKEA RÅSKOG, can become your mobile command centre, holding everything from pre-portioned formula to a phone charger. Crucially, as per NHS guidance, for the first six months, this entire setup should be replicated in your own bedroom, with a bedside cot forming the first point of the triangle. Mastering this setup reduces disruption, promoting quicker settling for the baby and more rest for you.
Night Feed Triangle Setup for a UK Box Room
- Position the cot perpendicular to the wall, not flush against it. This creates a more open feel and makes changing sheets easier, while still maintaining the essential 60cm distance from radiators.
- Place your feeding chair within 2-3 steps of the cot, ideally in a corner for back support. This creates a cosy, contained nook.
- Set up the changing station on the path between the cot and chair, completing the triangle. All nappies, wipes, and creams must be within arm’s reach of the mat.
- Keep a tiered utility cart next to the feeding chair. Stock it with a red-light lamp (which doesn’t disrupt melatonin), an insulated flask, nursing supplies, and muslins.
- Ensure a clear floor path between all three points. Remove rugs or obstacles that could cause you to trip while carrying your baby in the dark.
- For the first 6 months: Replicate this triangle in your bedroom. The bedside cot is point one, your bed (with you in it) is point two, and a nearby changing station/cart is point three.
The Instagram Nursery Trend That Puts Soft Toys Where They Can Suffocate Your Baby
Scroll through any #nurserydecor feed, and you’ll be met with a sea of beautifully curated cots. They are often filled with plush cot bumpers, artfully draped canopies, stacks of adorable cushions, and a menagerie of soft toys. It’s an image that sells a dream of cosy, gentle sleep. However, the tragic reality is that this aesthetic is in direct opposition to every piece of evidence-based safe sleep advice. A cot is a place for sleep, not a display case. For a baby, these items are not comforts; they are suffocation and strangulation hazards.
The Lullaby Trust’s advice is unequivocal: a baby’s sleep space should be clear and empty. This means no pillows, no duvets, no soft toys, no nests or pods, and absolutely no cot bumpers. These items can obstruct a baby’s airway if they roll over or increase the risk of overheating. Research published by the NCBI shows that soft bedding, including pillows and bumper pads, increases the risk of infant death five-fold, and this risk jumps to a 21-fold increase when a baby is in the prone (tummy) position.
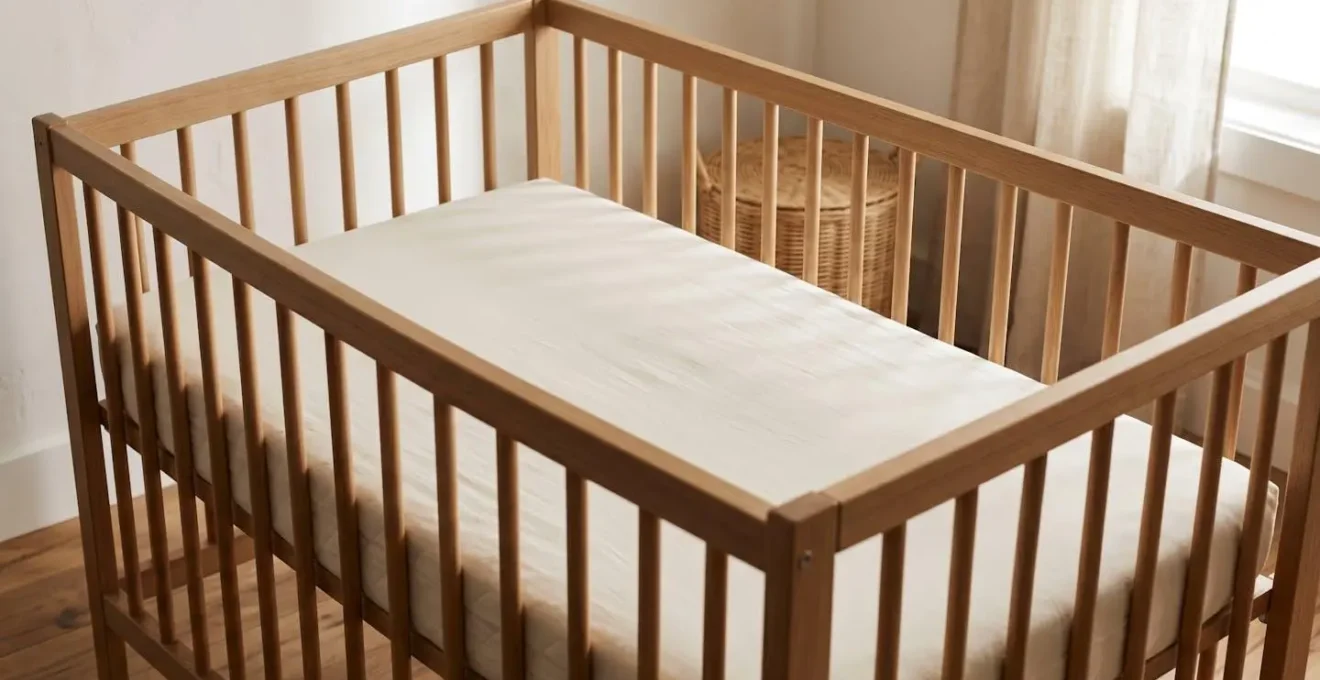
This doesn’t mean your nursery has to be sterile or devoid of personality. It simply requires a shift in thinking: decoration belongs on the walls, not in the cot. You can create a visually stunning and stimulating nursery by using bold wall decals, high-contrast art prints, or a feature wall with certified baby-safe paint. A securely fixed mobile hanging from the ceiling provides visual stimulation without posing a risk. The beautiful, bare cot in the image above is not empty; it is full of safety. This is the new standard of beauty we must embrace.
Safe & Stylish Nursery Swaps: Lullaby Trust Approved Alternatives
- Instead of cot bumpers: Create a stunning feature wall behind the cot using bold, geometric patterns with baby-safe paint.
- Instead of canopy drapes: Hang a high-contrast, securely fixed mobile from the ceiling, well out of your baby’s reach.
- Instead of decorative pillows in the cot: Display soft toys and cushions on high, wall-mounted floating shelves, transforming them into decor.
- Instead of fairy lights in or on the cot: Use cordless LED picture lights to highlight artwork on the walls, creating a soft, ambient glow.
- Instead of loose blankets: Use a tog-rated baby sleeping bag appropriate for the season. It provides warmth without the risk of covering your baby’s face.
When to Buy the Cot, Mattress, and Changing Table to Avoid Third-Trimester Panic?
Most parents-to-be assume that nursery furniture shopping is a third-trimester task. However, leaving it this late is a primary cause of stress and, more importantly, unsafe compromises. In the UK, lead times for quality furniture from retailers like John Lewis or Mamas & Papas can be 8-12 weeks. A delay in ordering can lead to a panicked, last-minute purchase of an in-stock floor model (with an unknown history) or a mattress that isn’t breathable, simply because it’s the only one available for next-day delivery.
A predictive safety approach involves strategic timing. The second trimester is the golden window for ordering large items like the cot and changing table. This not only accounts for delivery delays but also allows you to follow the crucial 4-week off-gassing rule. Assembling the cot in the nursery at least a month before your due date gives any chemicals from the finish or glue time to dissipate. This also avoids the struggle of trying to manoeuvre a built cot through narrow UK doorways and hallways.
Conversely, the mattress should be one of the last items you buy, around 4-6 weeks before your due date. This is to prevent it from being stored in potentially damp conditions, such as a garage during a UK winter, which can promote mould and mildew growth before it’s ever even been used. By planning your purchases across the trimesters, you can take advantage of sales events, reduce financial pressure, and ensure every single item in your nursery is a deliberate, safe choice, not a rushed compromise.
Your Trimester Timeline for Nursery Furniture Purchases
- Second Trimester (Weeks 14-27): This is the time to research and order the cot, changing table, and wardrobe. Factor in an 8-12 week lead time for delivery.
- Second Trimester (Week 20+): As soon as the cot arrives, assemble it in its final position in the nursery. This allows a minimum of 4 weeks for off-gassing.
- Third Trimester (Weeks 28-32): This is the ideal time to paint the nursery with your chosen zero-VOC paint, again allowing a full 4 weeks for the paint to cure and the room to air out.
- Third Trimester (Weeks 32-36): Now is the time to purchase the mattress. It will arrive fresh and can be unwrapped in the well-ventilated room, avoiding any risk of damp storage.
- Third Trimester (Week 34+): Conduct a ‘dry run’. Walk through your night feed routine, check that all furniture is securely anchored to the walls, and ensure the layout is practical.
How to Keep the Nursery at 16-20°C When Your Victorian House Has No Thermostat?
One of the most critical and often overlooked aspects of SIDS prevention is room temperature. An overheated baby is at a significantly higher risk. The Lullaby Trust and NHS recommend maintaining the nursery temperature between 16-20°C, with the ideal being around 18°C. This feels cool to an adult, but it’s perfect for a baby dressed in appropriate sleepwear. However, achieving this stable temperature in a typical UK home, especially a draughty Victorian property or an over-insulated new-build, can be a major challenge.
The absence of a central thermostat controlling each room individually means you need to create a microclimate in the nursery. This requires a two-pronged approach: accurate monitoring and localised control. A simple digital thermometer placed near the cot (but out of reach) is essential. Colour-changing thermometers like the Gro-Egg provide a useful at-a-glance visual cue, glowing blue for too cold, yellow for ideal, and red for too hot.
For control, the single most effective and affordable upgrade for a period property is installing a Thermostatic Radiator Valve (TRV) on the nursery radiator. This allows you to set the temperature for that specific room, independent of the rest of the house. Combining a TRV with thermal blackout blinds can make a huge difference in both winter and summer. In modern, well-insulated homes, the problem is often overheating. Here, ensuring trickle vents in windows are open and using smart TRVs can help maintain the ideal, safe temperature range.
This table outlines practical solutions for managing nursery temperature based on common UK housing types.
| Housing Type | Primary Challenge | Recommended Solution | Approximate Cost (UK) |
|---|---|---|---|
| Victorian/Period Property | Drafts, single-pane sash windows, uneven heating | Install Thermostatic Radiator Valve (TRV) on nursery radiator + thermal blackout blinds (Argos/Dunelm) | TRV: £30-60; Blinds: £25-50 |
| Victorian/Period Property | Cold spots, poor insulation | Temporary window film for draughts + heavy lined curtains; check sash window seals | Film: £15-25; Curtains: £40-80 |
| Modern New-Build | Overheating due to excellent insulation | Tado° smart TRV with phone control + ensure trickle vents in windows remain open | Smart TRV: £80-120 per room |
| Both Types | Accurate monitoring | Gro-Egg colour-changing room thermometer (visual cue) or basic digital thermometer | Gro-Egg: £15-20; Digital: £8-15 |
How to Set Up Your Living Room So Your Baby Wants to Move and Explore?
Your baby’s world will soon expand beyond the nursery. The living room is where much of their early motor skill development will happen, from their first roll to their first wobbly steps. Instead of seeing this as a new front in the babyproofing war, you can reframe it as an opportunity to create a ‘Yes Space’. This is a carefully prepared area where your baby has total freedom to touch, move, and explore without you constantly having to say « no » or intervene. This fosters independence, confidence, and accelerates development.
The foundation of a ‘Yes Space’ is a large, comfortable play mat. This visually and physically defines the safe zone. Within this zone, every item should be safe for your baby to interact with. A low, sturdy shelf, like an IKEA KALLAX unit on its side, is perfect for this. Stock it with a small, curated selection of 4-6 age-appropriate toys and rotate them weekly to maintain your baby’s interest. This Montessori-inspired principle of « toy rotation » prevents overwhelm and encourages deeper engagement.
To motivate movement, think about sensory variety and physical challenges. Layering different textures—a soft mat, a small sheepskin rug, the smooth wooden floor—stimulates their sense of touch. Mounting an unbreakable acrylic mirror at floor level is a powerful motivator for tummy time and crawling. Allowing supervised « risky play, » like climbing over large floor cushions or pulling up on a securely anchored coffee table, is crucial for building strength and problem-solving skills. The goal is a living room that invites exploration, not one that restricts it.
Creating a Floor-Level ‘Yes Space’ in Your Living Room
- Define the zone: Use a large, non-slip play mat to create a 100% baby-proofed area where your baby can have total freedom.
- Set up a floor-level shelf: Place a low, sturdy shelf (like an IKEA KALLAX on its side) at the edge of the mat with 4-6 accessible, safe toys. Rotate them weekly.
- Provide sensory variety: Layer different textures within the space—a soft mat, a natural rug, smooth floor—to encourage tactile exploration and movement.
- Install a motivation mirror: Securely fix a large, unbreakable acrylic mirror to the wall at floor level. This encourages tummy time, head lifting, and self-recognition.
- Allow safe ‘risky’ play: Under supervision, encourage your baby to climb over large floor cushions or pull up on sturdy, wall-anchored furniture to build motor skills.
Key takeaways
- Standards are not optional: Every major decision, from the cot (BS EN 716) to the paint (EN 71-3), should be driven by current British safety standards.
- Bare is best: An empty cot containing only a firm mattress and fitted sheet is the gold standard for safe sleep. Decoration belongs on the walls, not in the sleep space.
- Plan ahead: Purchase and assemble furniture in the second trimester to allow for delivery delays and crucial off-gassing time, preventing rushed, unsafe choices.
Why Babyproofing at 3 Months Prevents the A&E Visit at 7 Months?
The most common mistake in babyproofing is waiting until the baby is mobile. Parents often think, « They’re not rolling yet, so I have time. » This is a dangerous miscalculation. Developmental leaps happen suddenly, often overnight. The baby who couldn’t roll yesterday might roll off the changing table tomorrow. The baby who showed no interest in small objects might be crawling and putting everything in their mouth next week. True babyproofing is not reactive; it is predictive. You must secure the environment for the baby you will have in two months, not the baby you have today.
This means adopting a milestone-linked timeline for safety measures. When your baby is 3-4 months old and starting to wriggle, it’s time to lower the cot mattress and secure everything on the changing table—because they will soon be able to roll. When they start grasping at 4-5 months, it’s time to manage every single cord and cable in the house. When they are pulling to stand at 7-9 months, every piece of unsecured furniture becomes a tipping hazard. RoSPA consistently identifies furniture tip-overs as a leading cause of serious injury and death in the home.
The most powerful tool in your predictive safety arsenal is the ‘crawling-level inspection’. Once a month, physically get down on your hands and knees and crawl through your home. You will see the world from your baby’s perspective, revealing dangers you would never notice from a standing height: an exposed plug socket under a side table, a loose coin under the sofa, or a sharp corner on the TV stand. This proactive, empathetic approach is what truly transforms a house from a collection of hazards into a safe and nurturing home.
Your Plan: The Milestone-Linked Babyproofing Timeline
- 3-4 Months (Can Roll): Lower cot mattress from newborn height. Secure all items on changing table in closed containers. Remove mobiles attached to cot rails.
- 4-5 Months (Can Grasp): Manage all electrical cords with cable clips or trunking. Install cordless blinds or use cleats to wind up all blind cords securely out of reach.
- 6-8 Months (Crawling Begins): Install hardware-mounted stair gates at the top of stairs and pressure-mounted gates at the bottom. Fit magnetic locks on all low kitchen and bathroom cupboards. Cover all accessible electrical sockets.
- 7-9 Months (Pulling to Stand): Anchor ALL heavy furniture (dressers, bookcases, TVs) to the walls using anti-tip brackets. This is a critical, life-saving step. Pad all sharp corners on tables and fireplace hearths.
- Monthly Crawling-Level Inspection: Get on your hands and knees to see hazards from your baby’s perspective. This is non-negotiable for identifying overlooked dangers.
By shifting your mindset from reactive proofing to predictive safety, you are not just preventing accidents; you are building a foundation of security that allows your child the freedom to explore, learn, and grow. Start today by conducting your first crawling-level inspection, and take the first step towards creating a home that is as safe as it is loving.